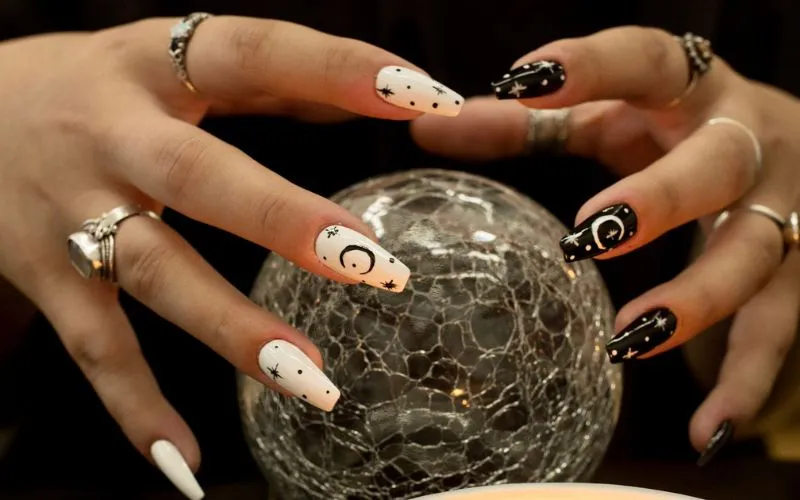
Moon nail designs have taken the world of nail art by storm, offering a unique and captivating twist on traditional manicures. With their elegant and celestial appearance, these designs have become a popular choice for those looking to add a touch of sophistication to their nails.
But what exactly are moon nail designs? Inspired by the shape of a crescent moon, these designs feature a delicate curve along the base of the nail, creating a striking contrast against the rest of the nail bed. Whether it’s a subtle accent or a bold statement, moon nail designs offer endless possibilities for creativity and self-expression.
One of the most appealing aspects of moon nail designs is their versatility. From minimalist and understated to intricate and detailed, there is a design to suit every taste and occasion. Whether you prefer a classic French manicure with a twist or a bold and vibrant color palette, moon nail designs can be customized to reflect your style.
Not only designs aesthetically pleasing, but they also have a symbolic meaning. The crescent moon is often associated with femininity, intuition, and creativity, making it a perfect choice for those who want to embrace their inner goddess. Additionally, the moon is a universal symbol of change and transformation, reminding us to embrace the cycles of life and find beauty in the ever-changing world around us.
In this article, we will delve deeper into the world of moon nail designs, exploring different techniques, color combinations, and nail art trends. We will provide step-by-step tutorials and tips for achieving the perfect moon nail design at home. So, whether you’re a seasoned nail art enthusiast or a beginner looking to try something new, join us on this celestial journey as we explore the captivating world of moon nail designs.
What Are Moon Nail Designs?

Moon nail designs have become increasingly popular, with many women embracing this unique and stylish trend. But what exactly are moon nail designs? In this article, we will explore the ins and outs of this nail art technique and why it has captured the attention of so many.
Moon nail designs, also known as reverse French manicures, involve painting the crescent shape at the base of the nail with a contrasting color, leaving the rest bare or painted with a different shade. This creates a stunning and eye-catching look that is both modern and sophisticated.
One of the reasons why moon nail designs have gained popularity is their versatility. You can experiment with different colors and patterns to create a wide range of looks, from subtle and understated to bold and dramatic. Whether you prefer classic and elegant designs or edgy and unconventional styles, there is a moon nail design that will suit your taste.
Another advantage of moon nail designs is that they can be easily customized to match any occasion or outfit. Whether attending a formal event, going out for a casual day with friends, or simply wanting to add glamour to your everyday look, moon nail designs can be adapted to suit any aesthetic.
To achieve the perfect moon nail design, it is important to start with well-groomed nails. Shape and file your nails to your desired length and clean them thoroughly. Apply a base coat to protect your nails and ensure a smooth application of the colors. Then, carefully paint the crescent shape at the base of your nails with your chosen color, and finish off with a top coat to seal in the design and add shine.
Moon nail designs are a trendy and versatile nail art technique that allows for endless creativity and customization. Whether you’re a nail art enthusiast or simply looking to try something new, moon nail designs are worth a try. So get creative and show off your unique style with a stunning moon nail design!
How to Do Moon Nail Designs?
Moon nail designs have become a popular trend in nail art. This unique style features a crescent-shaped design at the base of the nail, resembling a moon. If you want to try this fashionable look, follow these simple steps to achieve stunning moon nail designs.
First, prepare your nails. Remove any old polish and shape them to your desired length and shape. Apply a base coat to protect your nails and allow the polish to adhere better.
Next, choose your desired nail polish colors. Moon nail designs look best with contrasting colors, so consider pairing a light shade with a dark shade. Apply the lighter color as the base coat and let it dry completely.
Once the base coat is dry, it’s time to create the moon shape. Use a nail art brush or a small makeup brush dipped in the darker nail polish. Gently curve the brush along the base of your nail, creating a crescent shape. Take your time and be precise to achieve a clean and defined moon shape.
Allow the moon shape to dry before moving on to the next step. Once it’s dry, apply a top coat to seal in the design and add shine to your nails. This will also help your moon nail design last longer.
You can incorporate other nail art techniques to add flair to your moon nail design. For example, you can add glitter, rhinestones, or a French tip to enhance the overall look.
With these simple steps, you can create stunning turn heads. Experiment with different colors and styles to find the perfect moon nail design that suits your style. So, grab your nail polish and get ready to rock this trendy nail art style!
What Tools Do I Need for Moon Nail Designs?

Moon nail designs have become increasingly popular in recent years, and it’s no wonder why. These unique and stylish designs add a touch of elegance to any manicure. If you want to try, you may wonder what tools you’ll need to achieve the perfect look. This section will explore the essential tools you should have in your nail art kit.
Good quality nail polish is one of the most important tools for moon nail designs. Opt for a base color that will serve as the background for your design. Classic shades like black, white, or nude are popular choices. Additionally, you’ll need a contrasting color for the crescent moon shape. Metallic or glitter polishes work well for this purpose.
To create the crescent moon shape, you’ll need a nail art brush or a small, fine-tipped brush. This will allow you to achieve precise lines and curves. You can also use nail art stickers or stencils if you prefer a more straightforward approach.
Another essential tool for moon nail designs is a dotting tool. This tool will help you create perfect dots or small details on your nails. It’s especially useful if you want to add additional elements to your moon design, such as stars or other celestial symbols.
Lastly, remember to invest in a good-quality top coat. This will seal and protect your design, ensuring it lasts longer without chipping or peeling.
Achieving stunning moon nail designs requires a few essential tools. With good quality nail polish, a nail art brush, a dotting tool, and a top coat, you’ll be well on your way to creating beautiful and eye-catching manicures. So gather your tools, and let your creativity shine through your moon nail designs!
What Are Some Popular Moon Nail Design Ideas?
Moon nail designs are a trendy way to express your style. Whether you prefer a minimalist look or something more intricate, there are endless possibilities for creating stunning moon-inspired nail art. This section will explore some of the most popular moon nail design ideas to inspire your next manicure.
One popular moon nail design is the classic half-moon manicure. This design features a crescent shape at the base of the nail, creating a moon-like appearance. You can paint the half-moon in a contrasting color or add some sparkle with glitter polish. This design is versatile and can be customized to suit any occasion.
Another popular moon nail design is the celestial theme. This design incorporates various night sky elements like stars, moons, and galaxies. You can use shades of blue and silver to create a dreamy and ethereal look. Add some tiny star decals, or use a nail art pen to draw constellations for an extra touch of celestial beauty.
For those who prefer a more minimalist approach, a simple moon accent nail can make a statement. Paint all your nails in a neutral color, then add a small moon shape on one nail using black polish. This design is elegant and understated, perfect for everyday wear.
If you’re feeling adventurous, try a lunar eclipse nail design. This design mimics the colors and shapes seen during a lunar eclipse, with red, orange, and black shades. Use a sponge or a small brush to create a gradient effect and add shimmer for a celestial twist.
Moon nail designs offer a wide range of options for expressing your creativity. Whether you prefer a classic half-moon manicure or a celestial-themed design, there is a moon nail design idea for everyone. So why not try something new and embrace the moon’s beauty at your fingertips?
Can I Do Moon Nail Designs at Home?

It have become increasingly popular in recent years, with many wanting to achieve this stylish and elegant look. If you’re wondering whether you can do moon nail designs at home, the answer is a resounding yes! With a little practice and the right tools, you can create stunning moon nail designs right in the comfort of your own home.
To get started, you’ll need a few basic supplies. First and foremost, you’ll need good quality nail polish in the colors of your choice. For a classic moon design, you’ll want a lighter shade for the base color and a darker shade for the moon shape. You’ll also need a small brush or a nail art pen to create the moon shape, as well as some nail polish remover and cotton pads for clean-up.
Begin by applying a base coat to protect your nails and ensure your nail polish goes smoothly. Once the base coat is dry, apply your lighter nail polish to the entire nail. Allow it to dry completely before moving on to the next step.
Using your small brush or nail art pen, create a crescent shape at the base of your nail using the darker shade of nail polish. This is the moon shape that gives the design its name. Take your time and patience with this step, as precision is key.
Once you’re happy with the shape, let the design dry completely. Finish off with a top coat to seal your design and add shine. And voila! You’ve just created a beautiful moon nail design at home.
With a little practice and experimentation, you can create endless variations. The possibilities are endless, from different color combinations to adding glitter or other embellishments. So why not give it a try and unleash your creativity?
Moon nail designs are something you can do at home. You can achieve stunning results with the right tools and a little patience. So, express your style with these elegant and trendy nail designs.
How Long Do Moon Nail Designs Last?
Moon nail designs have become increasingly popular, with many people embracing this unique and stylish trend. However, one question that often arises is, how long these designs last? In this section, we will explore the longevity of moon nail designs and provide tips on making them last even longer.
Several factors affect the durability of moon nail designs. The quality of the nail polish used, the application technique, and the overall care taken can all affect how long the design will last. Depending on these factors, moon nail designs can last anywhere from one to two weeks on average.
To ensure the longevity of your moon nail design, it is important to start with a clean and well-prepped nail surface. This means removing old polish, shaping the nails, and pushing back the cuticles. Applying a base coat before the design can also help to protect your nails and make the design last longer.
When it comes to applying the design itself, precision is key. Using a steady hand and taking your time can help to create a clean and crisp moon shape. Additionally, applying thin layers of polish and allowing each layer to dry fully before adding the next can contribute to the design’s longevity.
Once your moon nail design is complete, it is important to take proper care of your nails to make them last as long as possible. Avoid activities that may cause excessive wear and tear, such as washing dishes without gloves or using your nails as tools. Applying a top coat every few days can also help to protect the design and extend its lifespan.
Moon nail designs can last anywhere from one to two weeks with proper care and maintenance. Following the tips mentioned in this article, you can ensure that your moon nail design stays intact and beautiful for as long as possible. So go ahead and embrace this trendy nail art and enjoy its longevity!
How Do I Remove Moon Nail Designs?

Moon nail designs have become increasingly popular in recent years, with their unique and stylish appearance capturing the attention of many nail enthusiasts. However, as with any nail design, there may come a time when you want to remove it and try something new. This section will explore the various methods to effectively remove moon nail designs.
One of the most common and convenient ways to remove moon nail designs is using nail polish remover. Look for an acetone-based remover, as this will provide the best results. Soak a cotton ball or pad in the remover and place it on your nail, ensuring the entire design is covered. Allow the remover to sit for a few minutes, then gently rub the cotton ball in a circular motion to remove the design. Repeat each nail until all the moon nail designs are gone.
If you prefer a more natural approach, use warm, soapy water to remove moon nail designs. Fill a bowl with warm water and add a few drops of mild dish soap. Soak your nails in soapy water for about 10 minutes, then gently scrub away the design with a soft brush or toothbrush. Rinse your nails with clean water and pat them dry.
Another option is to use a nail file or buffer to remove moon nail designs. Start by gently filing the top layer of the design, being careful not to file too aggressively and damage your natural nails. Continue filling until the design is completely removed, then buff your nails to smooth out any rough edges.
Removing moon nail designs can be done using various methods such as nail polish remover, warm, soapy water, or a nail file/buffer. Choose the best method for you, and enjoy experimenting with new nail designs.
Can I Get Moon Nail Designs with Gel Polish?
If you’re a nail art fan, you’ve probably come across the trendy. This unique style features a crescent shape at the base of the nail, creating a modern and sophisticated look. But can you achieve this stunning design using gel polish? Let’s find out.
Gel polish has gained popularity recently due to its long-lasting and chip-resistant properties. It’s a great option for those who want their nail art to last for weeks without any touch-ups.
The traditional moon nail design involves painting the base of the nail with a contrasting color, leaving a crescent shape unpainted. With regular nail polish, achieving this look is relatively easy. However, gel polish tends to be thicker and harder to control, making creating precise lines and shapes challenging.
That said, it’s not impossible to create with gel polish. With a steady hand and some practice, you can achieve beautiful results. One technique is to use nail art brushes or thin striping tape to create clean lines and shapes. Another option is to apply a layer of gel polish as the base color and then use a different color to paint the crescent shape on top.
It’s important to note that gel polish requires curing under a UV or LED lamp, making it difficult to create intricate designs. However, if you’re willing to put in the effort and have some patience, you can achieve stunning moon nail designs with gel polish.
While gel polish may present some challenges when creating, it is still possible to achieve this trendy look. With the right tools, techniques, and practice, you can rock the moon nail design with gel polish. So go ahead and give it a try, and let your nails shine like the moon!
Conclusion
It’s trendy and stylish to express creativity and enhance the overall look. Throughout this post, we have covered various aspects, providing valuable information and tips to help you achieve the perfect manicure.
We started by exploring the concept, explaining what they are and how they differ from other nail art styles. We then delved into the step-by-step creation process, offering guidance on the tools and techniques needed to achieve stunning results.
Furthermore, we shared some popular moon nail design ideas, showcasing a variety of styles and color combinations that you can experiment with to suit your taste. Whether you prefer a classic French moon design or a bold and vibrant geometric pattern, there are endless possibilities to explore.
One key takeaway from this post is that moon nail designs can easily be done at home, saving you time and money from salon visits. With a few essential tools and a little practice, you can achieve professional-looking results in the comfort of your own home.
Additionally, we discussed the durability of moon nail designs and how long they typically last. While the longevity of your manicure depends on factors such as nail health and daily activities, proper care and maintenance can help prolong the lifespan of your moon nail designs.
We provide step-by-step instructions for removing moon nail designs to ensure a safe and easy process. By following these guidelines, you can avoid damage to your natural nails and maintain their health.
Thank you for reading this post. We hope you found it informative and inspiring. We encourage you to leave comments or feedback, as we value your thoughts and ideas. Happy moon nail designing!

