

Achieving a salon-quality manicure at home is a dream for many of us. It seems virtually impossible without the professional prowess and top-notch materials seasoned nail technicians have up their sleeves. But what if we told you that with the right tips and tricks, you can master the art of an impeccable hard gel manicure right in the comfort of your abode? This blog post will reveal the secrets to getting a flawless, long-lasting, high-gloss finish that could rival even your favorite nail bar. Prepare to conquer every step – from prepping to applying and curing to maintaining your hard gel nails for weeks! Let’s dive into a world where salon quality meets home convenience.
A hard gel manicure is a long-lasting and durable option for nail enhancements. It provides a protective shell for your nails, allowing them to grow without chipping or breaking. Hard gels are more flexible and natural-looking than acrylics, making them ideal for those who want stronger and healthier nails. Additionally, the gel can be used as a smooth base for regular nail polish. Consider getting a hard gel manicure if you want chip-free, strong nails that can last up to a month or longer compared to traditional shellac manicures.
Essentials of Hard Gel Application

To achieve a perfect hard gel manicure every time, it’s essential to understand the key elements contributing to a successful application. Whether you’re a professional nail technician or a DIY enthusiast, the following essentials will help you create salon-quality results at home.
Firstly, choose high-quality hard gel products. Opt for reputable brands known for their durability and longevity. Quality products ensure optimal performance, helping your manicure last weeks without chipping or lifting.
Next, invest in a quality LED or UV lamp. A proper curing lamp is crucial for achieving the strength and longevity desired by your hard gel manicure. Ensure that your lamp is compatible with your specific hard gel brand.
Additionally, practice proper nail preparation techniques before applying hard gel. This includes removing any existing polish, filing the nails into the desired shape, pushing back cuticles, and lightly buffing the nail surface to create an ideal canvas for gel application.
Now that we understand the essentials of hard gel application, let’s explore the first step towards achieving a perfect manicure – nail preparation techniques.
- On average, a hard gel manicure can last up to 4 weeks or longer, significantly outlasting traditional shellac manicures that typically last about 2 weeks.
- According to a survey by NAILS Magazine in 2019, approximately 31% of nail professionals reported using hard gels for their clients’ manicures.
- In terms of durability, flexibility, and aesthetics, a study published in the Journal of Cosmetic Dermatology in 2020 cited hard gels as superior to acrylics; they are less prone to chipping and appear more natural on the nails.
Nail Preparation Techniques
Before diving into the application process, it’s important to give proper attention to nail preparation techniques. These steps lay the foundation for a flawless hard gel manicure and ensure optimal adhesion and durability.
Start by cleaning the nails thoroughly using a non-acetone nail polish remover. This step helps eliminate any oils or residues on the nails that can hinder the proper adhesion of the hard gel.
Next, use a fine-grit file or buffer to shape your nails according to your preference. Take care to file in one direction to prevent splitting or damage to the natural nail.
For example, if you prefer a square shape with rounded corners, gently file each side of the nail in straight strokes and round off the corners slightly.
After shaping, push back your cuticles to create a clean and well-defined nail bed. Use a cuticle pusher or orangewood stick to push the cuticles away from the nail plate gently.
Removing the shine from the nail surface is important to ensure optimal adhesion of the hard gel. This can be done using a buffer or a fine-grit file. Gently buff the entire nail surface, focusing on the area closest to the cuticle, where lifting tends to occur.
Lastly, cleanse the nails with alcohol or nail cleanser. This step removes any remaining debris or oils from the nails, providing a clean surface for gel application.
These essential nail preparation techniques will create an ideal foundation for your hard gel manicure. Setting the stage for impeccable adhesion and long-lasting results.
Steps in Gel Polish Application
A perfect hard gel manicure at home requires attention to detail and a step-by-step approach. Let’s walk through the essential steps involved in gel polish application:
First, start by preparing your nails. Remove any existing polish, shape your nails using a file, and gently push back your cuticles. Cleanse your nails with alcohol or nail cleanser to ensure they are free from oils and residue.
Next, apply a thin primer layer to promote better adhesion between the natural nail and the gel polish. Allow it to dry completely before moving on.
Now, it’s time to apply the base coat. This layer acts as a foundation for the gel polish and helps it adhere properly. Be sure to apply it evenly and avoid getting it on your skin. Cure the base coat under an LED or UV lamp according to the manufacturer’s instructions.
Once the base coat is cured, it’s time to apply the gel color! Apply a thin, even layer of gel polish to each nail. Remember to cap the free edge of your nails to seal in the color and prevent premature chipping. Cure each layer under the lamp before applying subsequent coats if necessary.
After achieving your desired color intensity, apply a final layer of top coat for added shine and protection. Again, cure it under the lamp according to the recommended curing time.
Finish off by removing any residue with a lint-free wipe soaked in rubbing alcohol or cleanser. Gently massage some cuticle oil into your nails and cuticles for added moisture.
Congratulations! You’ve completed the steps for a stunning hard gel manicure. Now, let’s explore how you can care for your hard gel manicures to ensure their longevity.
Caring for Hard Gel Manicures

To maintain salon-quality results and prolong the life of your hard gel manicure, it’s important to follow some simple care tips:
First and foremost, remember to protect your nails. Please avoid using your nails as tools or exposing them to harsh chemicals or excessive water. Wear gloves when doing household chores or handling cleaning agents.
Regularly hydrate your hands and cuticles by applying nourishing hand cream and cuticle oil. This helps prevent dryness, cracking, and lifting of the gel polish.
If you notice any chips or breaks in the gel polish, resist the urge to pick or peel them. Instead, visit a professional for any necessary repairs or touch-ups. Attempting to fix them yourself may lead to more damage and compromise the integrity of your manicure.
Maintain the longevity of your hard gel manicure by avoiding activities that may cause unnecessary stress on your nails, such as excessive typing, aggressive filing, or using your nails to open packages.
Lastly, schedule regular maintenance appointments with a trained nail technician. They can provide gentle filing, removal of any lifting gel, and proper application of new gel layers if needed.
Following these simple care tips, you can enjoy your flawless hard gel manicure for an extended period.
Maintenance Tips for Extended Wear
Proper maintenance ensures your hard gel manicure lasts as long as possible. Follow these tips to extend the wear of your salon-quality gel manicure at home:
- Protect your nails: Avoid using your nails as tools for opening cans or scratching surfaces. This can put unnecessary strain on the gel and increase the risk of chipping or lifting.
- Use gloves: Always wear gloves when exposed to water or harsh chemicals, such as washing dishes or cleaning. Water and chemicals can weaken the bond between the gel and your natural nail, leading to premature lifting.
- Moisturize regularly: Keeping your nails and cuticles moisturized is essential for maintaining the health of your gel manicure. Apply a nourishing cuticle oil daily to keep your cuticles hydrated and prevent them from drying out and causing issues with the gel.
- Avoid excessive heat: Direct exposure to extreme heat sources like hot water or sunbeds can cause the gel to soften or melt, leading to damage or premature lifting. Be cautious when using hot styling tools or spending time in saunas.
- Schedule regular maintenance: Although hard gel manicures are known for their durability, it’s still important to visit a professional nail technician for regular maintenance appointments. They can assess your nails for any potential issues, perform necessary repairs, and offer expert advice on how to keep your gel manicure looking flawless.
Now that we’ve covered maintenance tips for extending the wear of your hard gel manicure, let’s focus on troubleshooting common challenges that may arise during the process.
Troubleshooting Gel Manicure Challenges
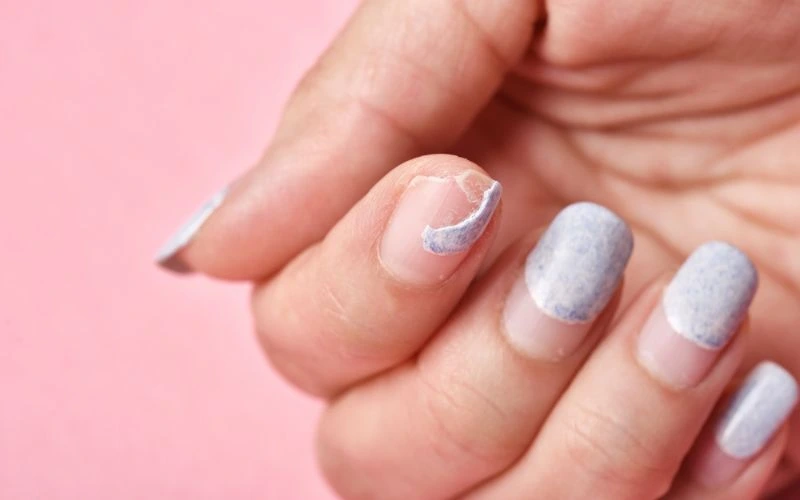
Even with careful application and proper maintenance, there may be instances where you encounter certain challenges with your gel manicure. Here are some common issues and quick fixes to help you navigate through them:
- Lifting: If you notice any lifting or peeling of the gel, it’s crucial to address it promptly. Gently buff the affected area with a fine-grit file to remove any lifted edges and roughness. Clean the nail surface with rubbing alcohol, apply a thin layer of bonding agent, and then reapply the gel.
- Chipping: To prevent chipping, cap the free edge of your nails during application to provide extra protection. If you experience chipping, lightly file down the chip to smooth any rough edges. Apply a small base coat or gel color to the chipped area and cure it under the UV or LED lamp.
- Air bubbles: Air bubbles can form during gel application if the layers are too thick or if there is debris on your nail surface. To avoid this issue, always apply each layer thinly and evenly. If you encounter air bubbles, lightly buff them out with a fine-grit file and then reapply a thin gel layer.
- Shrinking: Gel may sometimes shrink away from the edges of your nails during curing. This can create gaps and compromise the longevity of your manicure. To fix shrinking, apply a thin gel layer to the entire nail surface, paying extra attention to the free edge. Ensure each coat is fully cured under the lamp.
Remember, practice makes perfect for achieving salon-quality results at home. Don’t be discouraged if you face challenges – troubleshoot and adapt your technique as needed.
Taking care of your gel manicure involves addressing common issues like lifting, chipping, air bubbles, and shrinking. You can fix lifting by gently buffing the affected area and reapplying the gel with a bonding agent. To address chipping, file down the chip and apply a base coat or gel colour to the area. Avoid air bubbles by applying thin and even gel layers and buffing them out if they occur. Finally, prevent shrinking by applying a thin gel layer to the entire nail surface and ensuring proper curing. Remember to practice and troubleshoot as needed to achieve salon-quality results at home.
Common Issues and Quick Fixes
You may encounter a few common issues when achieving that perfect hard gel manicure at home. But don’t worry! Here are some quick fixes to help you overcome them and achieve salon-quality results quickly.
One of the most common issues is getting bubbles or streaks in your gel polish. This can happen if you don’t properly shake the polish bottle before application or if you apply the polish too thickly. To fix this, gently roll the polish bottle between your hands to mix it thoroughly. Also, apply thin, even coats of polish, allowing each layer to dry completely before applying the next.
Another issue that many people face is gel polish lifting or peeling off prematurely. This can occur if the nail surface isn’t properly prepped or if you haven’t applied a base coat. To avoid this, always start with clean nails and use a good-quality base coat before applying gel polish. Make sure to cap the edges of your nails with each layer of polish for better adhesion.
Additionally, some individuals may experience difficulty curing the gel polish under their lamps. This could be due to using a lamp with insufficient wattage or not curing each layer for the recommended time. Check that your lamp meets the specifications required for your gel polish brand, and ensure you follow the recommended curing times for each layer.
By addressing these common issues and implementing these quick fixes, you’ll be able to enjoy stunning, hard gel manicures at home without any hassle.
Comparing At-Home Manicures and Salon Services
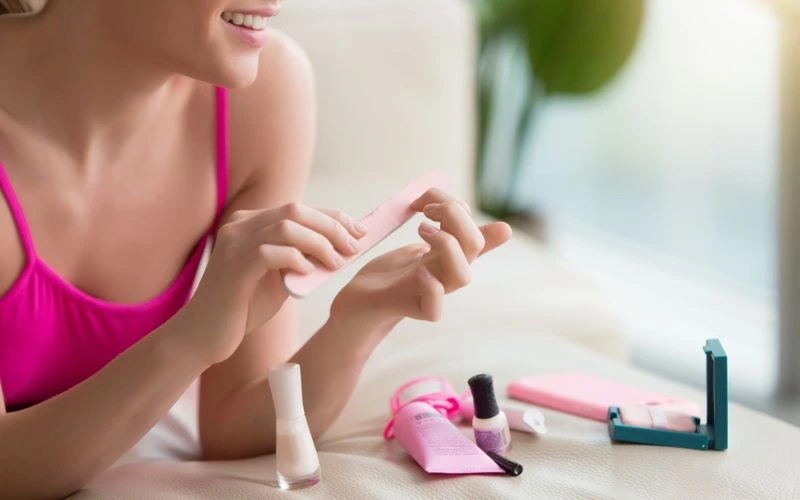
Now that we’ve explored some key tips for achieving a perfect hard gel manicure at home let’s delve into comparing at-home manicures with salon services. Understanding the differences between these options can help you make an informed decision based on time, costs, and quality considerations.
While salon manicures offer the expertise of professional nail technicians, at-home manicures provide the convenience of doing it yourself whenever you desire. Salon services often require booking appointments and setting aside dedicated time, which may not always be feasible in our busy lives. On the other hand, doing your manicure at home allows flexibility in terms of scheduling and eliminates the need for travel.
In terms of cost, salon manicures can be quite expensive, especially if you opt for regular appointments or additional embellishments. The cost of gel polish application and removal can quickly add up. On the other hand, at-home manicures provide a more budget-friendly option in the long run. The initial investment in tools and products may seem higher, but it can be used repeatedly.
Quality is another important factor to consider. Skilled nail technicians at salons have years of experience and training to deliver precise and flawless results. However, you can achieve salon-quality outcomes with at-home manicures with practice and attention to detail. It’s all about learning proper techniques, investing in high-quality products, and dedicating time to perfecting your skills.
Considering these comparisons between at-home manicures and salon services will help you determine which option aligns better with your needs, lifestyle, and preferences.
Time, Costs, and Quality Considerations
When achieving a perfect hard gel manicure at home, several factors must be considered – time, costs, and quality. Let’s explore these considerations in detail to help you achieve salon-quality results without breaking the bank or sacrificing the durability and beauty of your manicure.
Firstly, let’s talk about time. While a hard gel manicure can last up to a month or longer, the application process typically takes longer than traditional shellac manicures. It requires careful prep work, including nail filing and shaping, cuticle maintenance, and proper product application. Allowing enough time for each step ensures optimal bonding and longevity of the manicure. Moreover, curing the gel under an LED or UV lamp adds extra minutes to the process. However, investing this additional time pays off with a chip-free, long-lasting manicure that makes your efforts worthwhile.
Now, let’s delve into costs. The cost of a hard gel manicure may vary depending on various factors, such as location and salon. On average, it ranges from $80 to $125. While this might seem higher than traditional shellac manicures or regular polish applications, it’s important to consider the value you receive in return. Hard gel manicures provide chip-free nails for at least a month or longer when maintained properly. The durability and strength of hard gel make it an attractive option for those looking to grow out their natural nails or maintain flawless nails without frequent touch-ups.
To put things into perspective, imagine spending around $100 on a hard gel manicure that lasts four weeks without chipping or peeling. On the other hand, getting two regular polish applications within that duration could cost you around $40 but would require multiple touch-ups due to chipping or wear and tear.
Lastly, quality is crucial for achieving a professional-looking hard gel manicure. While the application process may seem intimidating initially, it provides control and customization that can result in stunning nails. Applying hard gel requires attention to detail, proper technique, and high-quality products. Investing in reputable brands and tools can significantly impact the overall outcome.
When weighing the time, costs, and quality considerations, assessing your priorities and preferences is important. A hard gel manicure might be the perfect choice if you value long-lasting durability and flawless nails and don’t mind spending more time on the application.
Think of it like investing in a high-end piece of clothing that may cost more initially but offers exceptional quality and longevity compared to cheaper alternatives that need frequent replacement or repairs.
By carefully considering these aspects, you can achieve salon-quality results with a hard gel manicure at home. Remember, practice makes perfect, so don’t be discouraged if your initial attempts aren’t flawless. With time and patience, you’ll master the art of applying hard gel and enjoy beautiful, long-lasting manicures from your home.

